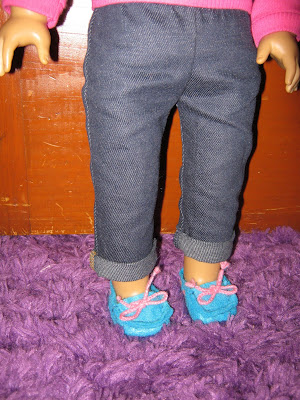
Hello Everyone!! I will warn you now... This is a really long but super
cool post!! I'm so excited!! So the inspiration from this craft comes
from AG's Bow-Toe Moccasins:

I think these are really cute but when I saw them again in the store I just thought I could make this and make them look more like my own. So on the way home I started thinking, and after lots of trial and error, I made a super cute pair of shoes.
What you will need:
- Felt in the color of your shoe
- Needle and thread and then a yarn needle or thing to pull your yarn or ribbon through holes.
- Pins, scissors, pencil, pen, ruler.
- yarn or thin ribbon.
Next cut 2 strips 5 centimeters wide and as long as it is around your doll's foot plus extra seam allowance.
(this picture has thinner strips and I learned that those did not allow the shoe to stay on)
Thread your needle and line up the edge of your strip with the edge of your foot cutout on felt and straight stitch all the way around. I did all of my stitching by hand. You will need to constantly re-align the edges to make it the right shape to stay on the foot.
Once you get all the way around stitch up and join the edges together. Tie a knot and cut your string.
Flip it right side out. It should stay on the foot. If not, sew the back seam up tighter.
After that, take one of the foot cutouts and place it on top of the foot. Fold it back where you want the top flap to end. Cut it out and place it on top of the other foot cutout and cut that one so they are identical.
Place the flap on top of the shoe...
Pin the sides so they are snug, but not too tight. Refer to the picture from AG to get the shoes to look right. Remember that one of the tricks to shoes looking nice is that they match and are identical.
Sew it up!! I just used a straight stitch for most of it but then on the ends I went over to make it go over the top. (I can't remember what that is called. Then I trimmed off the edges to make them look nicer. This style of moccasin was very popular and stylish last year-
And on the top edges in the front they did the stitch that goes over all the way around. I chose not to because my stitches can be uneven and I didn't want the shoe to look like a blue dumpling.
Here are the shoes after the trim. But wait, there's more!!! ;)
I am going to add lacing detail like the human shoe. I made four holes on either side of the shoe, one hole on each side of the back seam. and two holes on the front flap for a total of 12 holes.
Use a pin or needle to poke the holes and then wiggle them around to widen the hole. I then used my yarn needle to make the holes bigger.
Next get out your thin ribbon. I chose to tightly braid yarn instead. I then tied off the ends with thread so that it wouldn't come undone.
I used my yarn needle to push the yarn through the holes. Put the ends of the yarn through the holes in the flap and tie them in a bow. If you want to you can put a cardboard cutout in the shoe and glue another on the bottom. I didn't because it felt as though the shoe was not as secure.
If you push the seam down on the top part of the shoe they look so realistic!!! Also if the shoes are loose you can use the lacing to tighten the shoe.
I love these and my overly critical brother even said, "Oh, those are pretty cute. They even look a little bit like the AG ones." :)
If you have any questions at all on how to make these please leave a comment!!! I will gladly help you!!
Thanks for reading!!!
~Hannah (the human)
P.S. Here is( personally) the best picture of how they look in real life.
:)


Wow, those are awesome!!
ReplyDeleteThank You!!!
DeleteWow! This is really cool! I love how they turned out. Keep up the good work!
ReplyDeleteThanks!! I really love them and I'm super glad that I didn't buy the AG version.
Delete